UTUVO Monitor User Manual
Version 0.4.0 (build 62) | English edition | Offline manual edition 2026-11-06
This manual describes UTUVO Monitor 0.4.0 (build 62), the standalone macOS monitoring controller app. Everything here reflects the features actually present in the bundled app. This is the offline manual edition that ships with the installer; it is not a web edition.
01 About this manual
01.1 Who this is for
UTUVO Monitor is for engineers and producers who need precise monitoring control between their DAW, audio interface, and speaker system. This manual covers:
- How to get sound to a physical output safely, avoiding sudden loud levels that could hurt your ears.
- How to map every DAW channel to the correct speaker.
- How loudness metering, Scenes, and Macros turn repeated setup into a single repeatable action.
- When not to trust a number on screen, and where to look instead.
01.2 How to read this manual
| Chapters | What you want to do | Suggested approach |
|---|---|---|
| 02–05 | Install and get going | Read straight through; do not skip |
| 06–09 | Understand signal flow | Read once to build the mental model |
| 10–15 | Advanced features | Look up as needed |
| 16–18 | Automation and remote control | Read when you add a controller |
| 19–22 | Maintenance and troubleshooting | Jump straight to a symptom |
Every procedure uses the same fixed structure: prerequisites → steps → expected result → what to inspect when it fails. "Expected result" tells you whether the step actually worked. "What to inspect when it fails" saves you from re-reading the whole chapter.
01.3 About the figures
Every screenshot in this manual is a synthetic illustration. The device names, numbers, and meter levels in the figures are offline demo data — not live hardware measurements — and are not your routing state. Always trust what the app actually shows at the moment.
01.4 What this edition does not cover
- Network audio streaming and cross-network remote sync, which this build does not provide.
- Avid EUCON control and third-party controller LINK integration.
- How to obtain the Remote app, or its App Store status — it is not included in this installer.
- Cue mixes and Talkback: both are archived in this build and unavailable. See Chapter 22.
- Room measurement calibration: this build has no microphone-based room measurement procedure.
02 System requirements and installation
02.1 Requirements
| Item | Requirement |
|---|---|
| Operating system | macOS 14 (Sonoma) or later |
| Processor | Apple Silicon (M-series) |
| Audio interface | Any Core Audio output device; multi-channel output recommended |
| Microphone permission | Required. UTUVO Monitor captures its audio source (including virtual input devices), so microphone permission is required; no physical microphone hardware is needed — a purely virtual capture needs it just the same |
| Disk | Follow the space requirement shown by the download page and the installer, and reserve extra room for settings, backups, and your own SOFA files |
This build does not support Intel Macs or macOS 13 and earlier. If your machine does not match, installation will be refused by the system.
02.2 Installation
Prerequisites: you have the DMG and the .pkg inside it; you have administrator rights.
- Open the DMG image.
- Double-click the
.pkginstaller inside it. - Read the description in the installer and click Continue.
- Choose the install destination (normally your startup disk) and click Continue.
- If prompted, enter your macOS login password and click Install.
- Wait for the installer to report completion, then close it.
- Restart your Mac.
The .pkg installs the app into Applications — there is no separate drag-and-drop step.
02.3 After installing
Once installation finishes and you have restarted, open UTUVO Monitor from Applications.
Installing the app does not itself start the audio engine. When you open the app, it attempts to start your last saved routing muted. This keeps "install" permanently silent — sound only appears once you release CUT.
If macOS shows a security prompt during install or first launch, note that the prompt text alone does not mean the package is bad. Judge it by checking the package's origin, its signature and its notarization status, and keep the full error text so you can report it accurately.
03 First launch, permissions, and the safe starting state
03.1 Microphone permission (required)
UTUVO Monitor has to capture its audio source — your DAW, your player, and virtual input devices such as UTUVO 2. macOS treats those as microphone inputs, so microphone permission is required before the engine can start.
On first launch macOS asks whether UTUVO Monitor may use the microphone. Click OK.
If you clicked Don't Allow, you can grant it later:
- Open System Settings → Privacy & Security → Microphone.
- Find UTUVO Monitor in the list.
- Turn on the switch beside it.
- Quit and relaunch UTUVO Monitor completely (⌘Q — closing the window is not enough).
If permission is denied the engine cannot start, and the app sits in a state with no output at all. That is a permission outcome, not a routing mistake.
You do not need physical microphone hardware — a purely virtual source needs the same permission.
03.2 What you should see on first launch
The main window appears. At this point:
- The app attempts to start your last saved routing muted (CUT lit). On a fresh install there is no stored routing to restore.
- The CUT indicator in the top bar is lit, meaning the system is in its safe muted state.
- The SOURCE meters may already be moving while CUT is lit — CUT mutes the engine's output, but it does not stop the source-side measurement.
03.3 Your first safety action: confirm CUT is lit
Prerequisites: the app is open.
- Look at the top bar of the main window and find the CUT indicator.
- Confirm it is lit / red.
Expected result: CUT is lit, which means UTUVO Monitor's engine output is muted.
⚠️ CUT only guarantees that this app's engine output is muted. Other applications on the same interface are not covered by that guarantee; whether the hardware-level mute reaches them depends on the interface and its driver (see 04.1).
When it fails, inspect:
- If CUT is already dark, something has unmuted. Turn your physical level (monitor knob, interface volume) down to its minimum first, then check whether CUT was pressed or a mute was released.
- If you cannot find the CUT indicator, you may be looking at a different window. UTUVO Monitor is a
single-window app; close any description panel with
⌘W.
04 Safe monitoring and CUT
04.1 What CUT actually does
CUT is the app's safety gate. When you engage CUT, UTUVO Monitor:
- Mutes the engine's output — the engine itself keeps running and keeps measuring.
- Sends a mute to output devices that support hardware muting, including sub-devices of multi-output devices and satellite outputs. On devices without hardware mute support, only the software-level mute applies.
When you release CUT, UTUVO Monitor withdraws the mute it applied.
CUT only guarantees that UTUVO Monitor's own engine output is muted. Whether other applications sharing the interface are muted too depends on whether that interface supports hardware mute, and on who applied the mute.
⚠️ Releasing CUT clears hardware mute, and that mute may not have been set by this app. If your interface was muted earlier by another application or by the system, releasing CUT can clear that as well and make that application audible. Conversely, on an interface with no hardware mute support, the app cannot promise that other applications are muted at all. This is hardware behaviour, not a misjudgement by the app. Before working on a shared interface, check the volume state of the other applications.
04.2 CUT does not stop the engine
CUT is a mute, not a stop:
- The engine keeps running and keeps measuring.
- The SOURCE meters keep moving while CUT is lit — source metering reads the signal before the fader.
- That lets you confirm "is signal arriving, and is left/right correct" in complete silence.
04.3 Standard procedure for releasing CUT
Prerequisites:
- You have already turned the physical output level down to its minimum (not the in-app volume — the knob on the speaker or the interface preamp).
- You have confirmed the selected output device is the one you want to hear.
Steps:
- Physically lower the output level to its minimum.
- Back in the app, confirm the top bar CUT is lit.
- Set MAIN VOLUME to the level you intend to work at (start around −20 dB the first time).
- Check the SOURCE meters for signal on both sides (still silent).
- Release CUT.
- Raise the physical level slowly, watching the meter to confirm signal is moving.
Expected result: the CUT indicator goes dark, your speakers are audible at a controllable level, and the source meters were already moving before you released it.
When it fails, inspect:
- No sound after releasing CUT, but the meters show signal → the problem is in the output chain, not the input chain. Check: is the right output device selected? Are the speakers powered and cabled? Is the interface's own level at zero?
- The meters show nothing either → an input-chain problem. See Source settings in Chapter 07 and clock settings in Chapter 09.
- Other apps become audible after releasing CUT → see 04.1.
04.4 CUT retention and ignore rules
- While switching output or input devices, if CUT is engaged (muted), the app retains the mute.
- If you release CUT during a switch, that release is ignored (because the switch restarts the engine) and CUT stays lit. Release it again once the switch has completed.
- Quitting the app releases its own mute so your interface is not left locked out next time. That does not mean it is a good idea to quit while the app is making noise.
04.5 Remote control exception (read this)
Remote controllers, Stream Deck, and Macros can release CUT and can raise the volume to 0 dB. They carry full control authority.
- This means a compromised remote device means your speakers will make sound even while you are away.
- Use remote control only on a private network you trust.
- Do not forward the UDP port to the public internet, even from your own server.
- After setting up remote control for the first time, test every button by hand in front of the computer before you rely on it remotely.
05 Quick start: 15 minutes to stereo recording and mixing
This chapter covers the most common use: a pair of nearfield monitors for everyday recording and mixing. Assume your interface has two outputs (Left / Right), and that UTUVO 2 — the virtual audio device — is installed.
05.1 Prerequisites
- The app is installed, is open, and microphone permission has been granted (the engine needs it to start — see 03.1).
- Your DAW or player keeps running normally; you do not need to quit it.
- Your interface output level is turned down to its minimum.
05.2 Why the virtual device is in the path
UTUVO Monitor monitors a digital source. The standard path for getting your DAW into the app is:
DAW / player  ──outputs to──▶  UTUVO 2 (virtual device)
                                 │
                                 └── back into UTUVO Monitor's Source (DEVICE = UTUVO 2)
                                           │
                                           └──▶ your physical interface output (Output) ──▶ speakers
Pointing the DAW straight at your speakers bypasses every processing the app does. Routing through the virtual device is what makes routing, EQ, calibration, and Scenes apply.
05.3 Steps
Step 1 — set the output in your DAW or player
- Open your DAW's audio settings (or the player's output chooser).
- Change the output device to UTUVO 2.
- Confirm it is 2-channel (stereo).
Step 2 — set the source (use the Source tile's own SET)
- Press the Source tile's own SET (gear) to open that source's settings.
- Choose DEVICE = UTUVO 2 and confirm LAYOUT = 2.0.
- Confirm channels 1 / 2 map to left / right.
- Close the settings window, then click the Source tile itself to make it the monitored source.
Step 3 — set the physical output (use the Output tile's own SET)
- Press the Output tile's own SET (gear) to open that output's settings.
- Choose the physical DEVICE and confirm LAYOUT = 2.0.
- Confirm channels 1 / 2 map to the left / right speakers.
- Close the settings window, then click the Output tile itself to make it the primary.
Step 4 — play and verify in silence
- Start playback in your DAW.
- CUT is still lit at this point (the engine started muted).
- Watch the SOURCE meters: confirm there is signal, and that both sides have it.
Step 5 — open the gate
- Bring MAIN VOLUME down to around −20 dB and turn the physical level to its minimum.
- When everything checks out, release CUT yourself, then raise the physical level slowly.
05.4 Expected result
- While playing, the SOURCE meters show the material (still silent).
- Left and right levels are broadly comparable (unless the material is inherently unbalanced).
- After releasing CUT, sound comes out of the correct speakers.
05.5 When it fails, inspect
| Symptom | Look here first |
|---|---|
| The engine will not start | Is microphone permission granted (03.1)? |
| The DAW outputs nothing | Is the DAW's output device changed to UTUVO 2? |
| No signal on the meters | From the Source tile's own SET, is DEVICE set to UTUVO 2, LAYOUT 2.0, channels 1/2 correct? |
| Meters show signal but no speaker sound | Wrong primary output, physical level down, speakers not connected |
| Sound on one side only | The 1/2 mapping on the Output side; speaker cabling; test each side separately |
| Left and right swapped | Check the Output mapping first, then the Source side (see 11.4) |
| Dropouts or crackling | Buffer size too small, sample-rate mismatch (Chapter 09) |
Advanced note: if your DAW uses "System Default Output", the device name shown in the app may differ from the one in your DAW. Match on the actual device name; do not compare against a screenshot.
06 Main window and top-bar controls at a glance
06.1 Main window layout
The main window has three areas:
- Top bar: global safety and quick controls — CUT, DIM, REF, plus the Scenes and Macros menus and the main window's SET (gear) control.
- Desk: the Source and Output control tiles, plus the Loudness metering card.
- Status bar: current sample rate, buffer size, routing summary, and similar readouts.
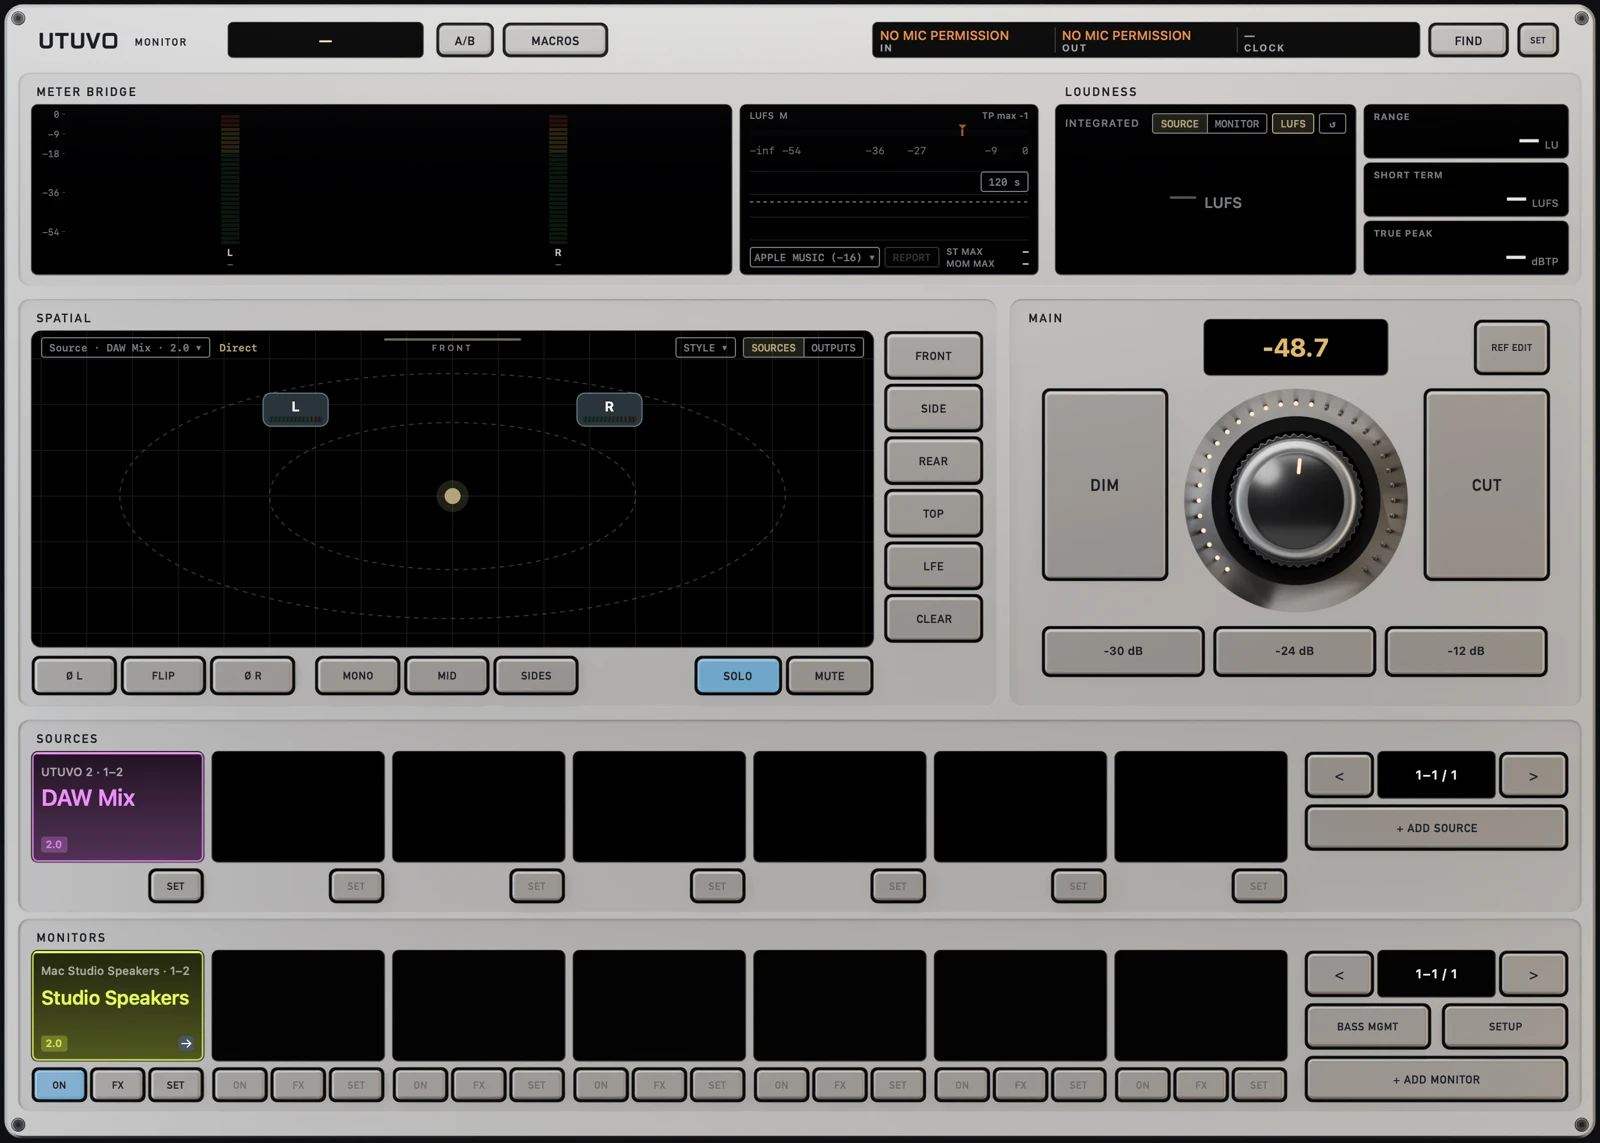
Figure 1: Main window illustration. The device names and numbers in the image are offline demo data — they do not represent your actual routing and are not live measurements.
06.2 The Source and Output tiles
| Tile | What clicking the tile itself does | Where to open that channel's settings |
|---|---|---|
| Source | Selects the monitored source | That Source tile's own SET (gear) |
| Output | Selects the primary output | That Output tile's own SET (gear) |
Every Source / Output tile has its own SET (gear) that opens the settings for that channel. The SET (gear) at the very top of the main window opens the global menu (OSC, Loudness, Theme, tool windows) — not the output settings.
06.3 The three top-bar safety controls
| Control | What it does | Recommended use |
|---|---|---|
| CUT | Mutes / unmutes (engine output + supported hardware mute) | Engage CUT before changing devices or Scenes; lower the physical level before releasing |
| DIM | Drops an extra amount below the current level (default −20 dB) | For talking, taking a call, or a quick dynamics comparison |
| REF | Stores / recalls a reference level (defaults −30 / −24 / −12 dB) | Recall a reference level at the start of each session so you always begin from the same level |
DIM quick choices: −6 / −10 / −12 / −20 / −30 dB. REF slots: three by default, with editable labels and a stored current level.
Recalling REF does not release CUT. If CUT is still lit when you recall REF, you still have to unmute yourself. This is deliberate: a volume reference should never bypass the safety gate.
06.4 The Scenes menu
Save as / Update / Rename / Delete / Set as A / Set as B / Compare. A Scene stores routing, monitoring state, loudness platform, layout, and main volume. See Chapter 16.
06.5 The Macros menu
Edit Macros opens the macro editor: 16 slots, up to 6 actions each. See Chapter 17.
06.6 The SET (gear) control
SET is the entry point for everything outside the monitoring desk: OSC on/off and port settings, Loudness platform and track markers, A/B level matching, the Theme appearance entry, and links to the tool windows.
06.7 Keyboard operation
| Key | Effect |
|---|---|
| ⌘K | Opens Find a Control — type a name to jump straight to that control |
| Space / Return | Operates the control that currently has focus (for example, toggling CUT) |
| ↑ ↓ ← → | Changes a knob value only when that knob actually has focus; nothing moves otherwise |
Do not assume global shortcuts exist. This build publishes no shortcut cheat sheet. Use ⌘K to find a control and read the key hints that control displays for itself. Your own global hot keys are configured in Settings → Hot Keys (see 19.1).
07 Source settings: channel mapping and Auto-assign
07.1 What a Source is
A Source is where your signal comes from — the digital audio source the app monitors. Clicking the Source tile in the main window switches the source you are monitoring; to set that channel's DEVICE, LAYOUT, and channel map, press the Source tile's own SET (gear).
07.2 The Source settings panel
| Field / button | Meaning |
|---|---|
| NAME | Source name, shown on the Source tile |
| COLOR | Tile identification colour |
| DEVICE | The actual audio device (for example UTUVO 2) |
| LAYOUT | Channel count and arrangement: 2.0, 4.0 (quad), 5.1, 7.1, 5.1.2, 5.1.4, 7.1.4, 9.1.4, 9.1.6, 9.2.6 |
| Auto-assign | Fills in a channel map based on LAYOUT |
| Source FX | Effect slots for this source (Chapter 14) |
| MAIN VOLUME | Level of this source into the main mix |
| M | Mutes this source |
| LOCK | Locks the source against accidental changes |
| PEAKS | Whether peak display is retained |
| LUFS | Loudness measurement target preference for this source |
| Previous / Next | Browses sources inside the editor only |
| Move left / Move right | Reorders sources in the list |
| Delete / Done | Delete the source / finish editing |
Previous / Next only move inside the editor; they do not change what you are monitoring. To switch the monitored source, click the Source tile in the main window.
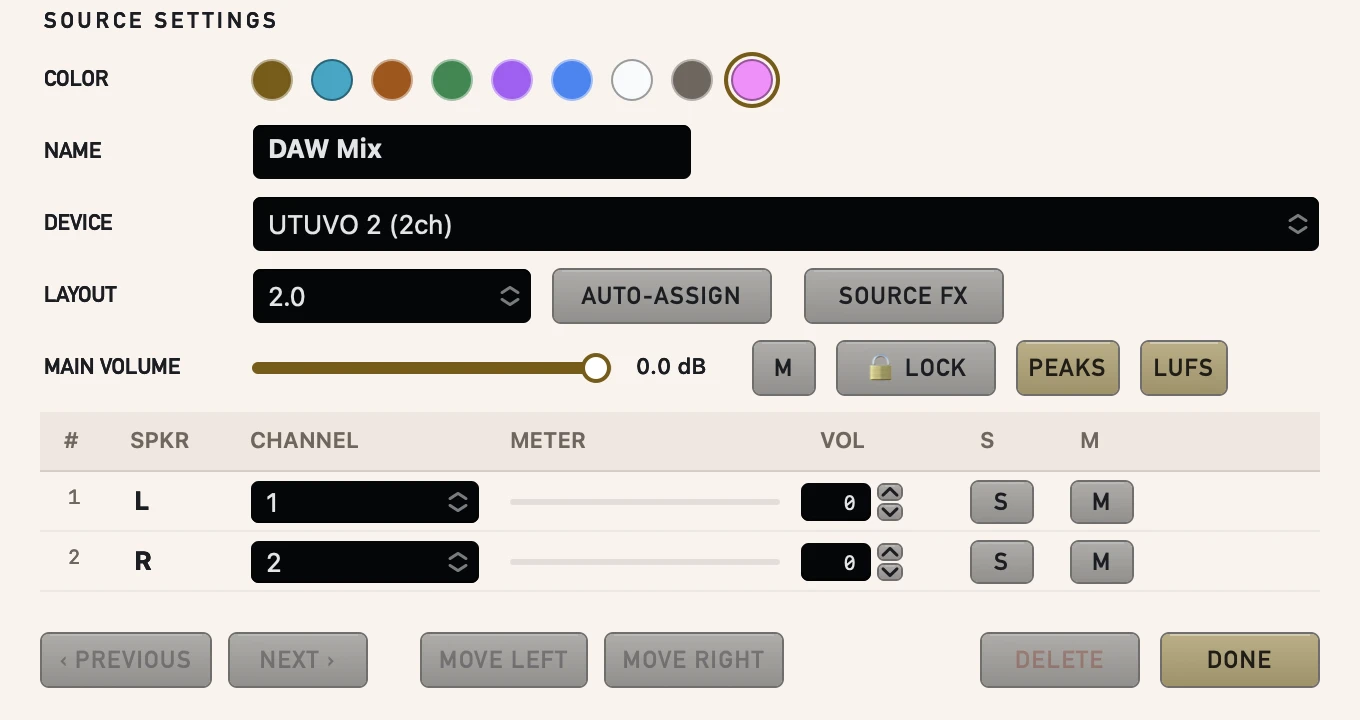
Figure 2: Source settings panel illustration. The device names and channel mapping shown are offline demo data and do not represent your settings.
07.3 Auto-assign is a starting point
Auto-assign produces a reasonable channel map for the chosen LAYOUT. It is a starting point, not proof:
- It does not know which physical wire or socket each speaker is on.
- It does not know your DAW's output order.
- Your interface may have 8, 12, or 16 sockets, and physical numbering often does not match logical numbering.
Always do this: after Auto-assign, go through every channel one at a time (or use the speaker check) to confirm it really reaches the speaker you think it does.
07.4 A 7.1.4 channel-map example
The following is an example 7.1.4 channel order (used to illustrate this manual, not a standard):
| Channel | Example name | Speaker |
|---|---|---|
| 1 | L | Front left |
| 2 | R | Front right |
| 3 | C | Front center |
| 4 | LFE | LFE / sub |
| 5 | Ls | Surround left |
| 6 | Rs | Surround right |
| 7 | Lrs | Rear left |
| 8 | Rrs | Rear right |
| 9 | Ltf | Top front left |
| 10 | Rtf | Top front right |
| 11 | Ltr | Top rear left |
| 12 | Rtr | Top rear right |
⚠️ This order is an example only. Your DAW's output bus order and your interface's physical numbering may not match the table above. The reliable method: solo one channel in the DAW (or send a test signal to a specific output bus), confirm with the speaker check which physical speaker moved, and then write that mapping into the app. A wrong mapping produces "sound on the wrong speaker" rather than "no sound", which makes it the easiest mistake to misdiagnose.
07.5 Switching the input device
Switching the input device triggers CUT and an engine restart. This is deliberate: without muting, two sources can briefly overlap.
Prerequisites: the channel map above has been verified.
Steps:
- Change DEVICE in the Source settings.
- Confirm the CUT indicator appears.
- Release CUT and re-check the level and the mapping.
Expected result: the new source becomes the monitored source with the mapping you set.
When it fails, inspect: the new device produces no sound → is that device actually outputting audio? Does it support the sample rate? See Chapter 09.
08 Output settings: primary output and satellites
08.1 The Output tile and the primary output
Clicking the Output tile in the main window selects the primary output:
- The primary output is always included in the set of active outputs, and its "active" lamp cannot be switched off — you cannot deactivate the primary with that lamp.
- But "always active" is not the same as "always audible": whether signal is arriving, and how loud it is, still depends on your source and routing.
- To change the primary, select another output in the list, making it the new primary.
- Switching the primary clears the extra-active flags of the outgoing and incoming primary; other outputs that remain active stay active.
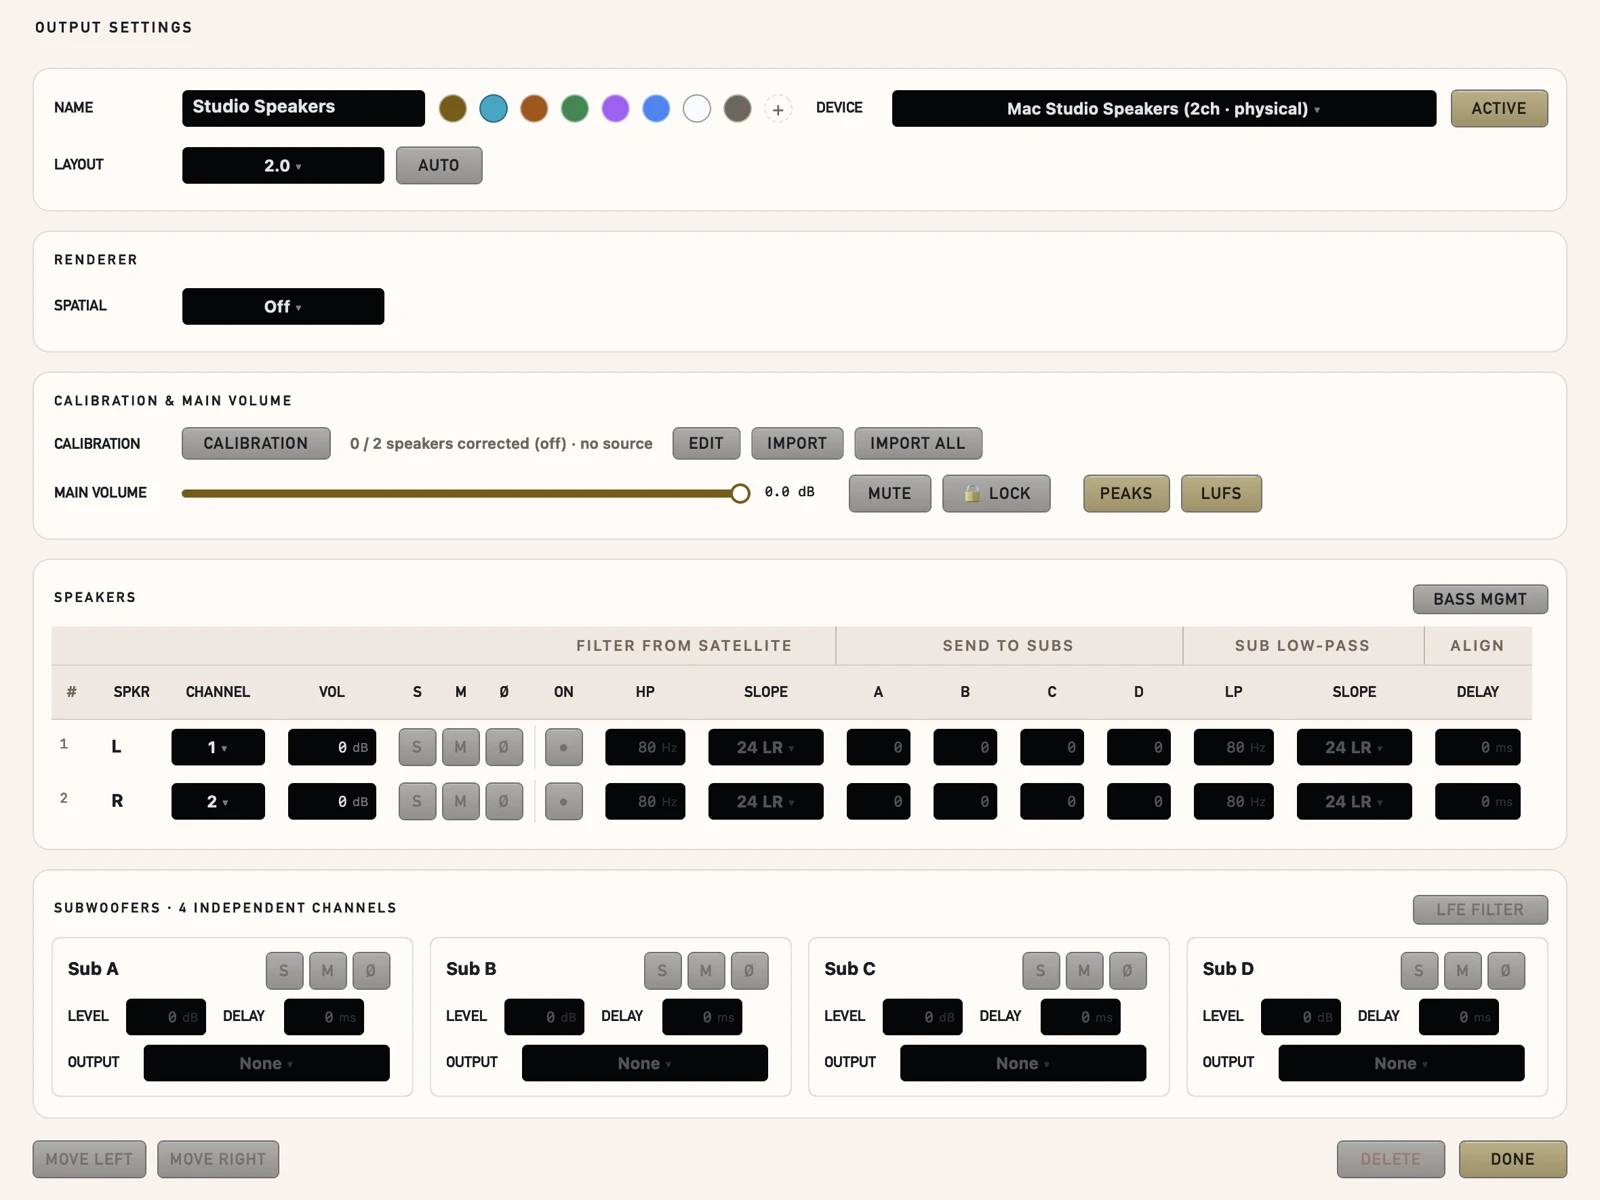
Figure 3: Output settings illustration. The device names and ACTIVE states shown are offline demo data and do not represent your actual outputs.
08.2 Additional outputs (small blue lamp / ACTIVE)
Each output in the list has a small blue lamp (or an ACTIVE label) that enables it as an additional output. Once enabled, it sounds at the same time as the primary.
- Enabling an additional output sets the ACTIVE flag first; the output is then asked to work alongside the primary.
- The engine then checks its processing bus: if that output's Audio Unit or bass-management bus is incomplete, invalid, or in conflict with the primary on channels, the engine mutes that bus or refuses to apply it — while the output may still remain ACTIVE.
- "It looks lit" therefore does not mean "the processing was applied correctly". Inspect the output's actual status and error messages rather than the lamp alone.
08.3 Satellites
You can add another interface as a satellite output:
- A cross-interface satellite is a direct path.
- Dolby fold is not applied to cross-interface satellite outputs. This is a known, deliberate limitation rather than a bug.
08.4 Processing available per output type
| Output type | Processing available |
|---|---|
| Apple Spatial / UTUVO Room | Primary output only; the renderer's output layout and mapping must be a stereo pair (your physical interface itself may have many more channels) |
| Other Main outputs on the same interface | Audio Units, headphone EQ, and calibration plans when the mappings are valid |
| Cross-interface satellite outputs | Direct output; a simpler path with fewer processing options |
The "primary only" and "stereo pair only" limits apply to Apple Spatial and UTUVO Room only. Dolby fold supports other output layouts and can be applied to other active Main outputs whose mappings and slots are valid; cross-interface satellite outputs stay on the direct path.
Do not assume every simultaneously enabled output receives identical processing. The app decides what each output can run based on its role and mapping validity, and shows the current availability or error state. When you enable many outputs at once, read the status messages instead of guessing.
08.5 Adding or removing a satellite device
Adding or removing a satellite device may trigger CUT and an engine restart. Lower your physical level first.
09 Audio clock, sample rate, and buffer
09.1 Requested and Actual
Audio Settings shows two values side by side, and this is one of the most important ideas in this build:
| Field | Meaning |
|---|---|
| Requested | The setting you (or the app) asked for |
| Actual | The setting the device actually adopted |
⚠️ Requested is not Actual. Your interface may accept a different sample rate than you requested because of firmware, drivers, or sharing. Always trust the Actual field, and check it after every apply.
09.2 Clock source
Choose Follow output / Follow input / a specific Master clock device.
- Follow output → the output device is the clock reference.
- Follow input → the input device is the clock reference.
- Specific Master clock → you nominate a device as the master clock.
Clock Source (internal / external) depends on whether the driver is writable. If your interface does not support it, the option is unavailable or read-only — a hardware limitation, not a missing implementation.
This is the Core Audio device clock. There is no network-time (NTP) setting to configure.
09.3 Sample rate
Choices: 44.1 / 48 / 88.2 / 96 / 176.4 / 192 kHz, plus follow device.
- Only options your device genuinely supports are enabled; the rest are unavailable.
- Driver support for 16 kHz does not mean every renderer or every Audio Unit supports 16 kHz. Work mainly at common values such as 48 kHz.
✅ From build 57 the input and output always run at one sample rate. With the default settings (follow the output device, no rate chosen) the input device follows the output device's rate when the app starts; if another app changes either end while it runs (for example a music app switching to 44.1 kHz), the app re-aligns them once. If the input's rate is locked by its driver, the app still starts and Audio Settings shows both rates in Hz — set both ends to the same rate by hand, or the audio will crackle.
09.4 Buffer
Choices: Device default / 32 / 64 / 128 / 256 / 512 / 1024 / 2048 samples.
- Device default → the interface driver decides; usually the best balance of latency and stability, and the safest choice for a new user.
- Smaller numbers → lower latency, but more likely to drop out under heavy plugin load.
⚠️ The buffer number (in ms or samples) is not the round-trip latency. Real latency also includes the driver's buffering, audio queues, any effects you have enabled, and the DELAY applied by calibration. Treating the buffer value as "recording latency" leads to wrong conclusions.
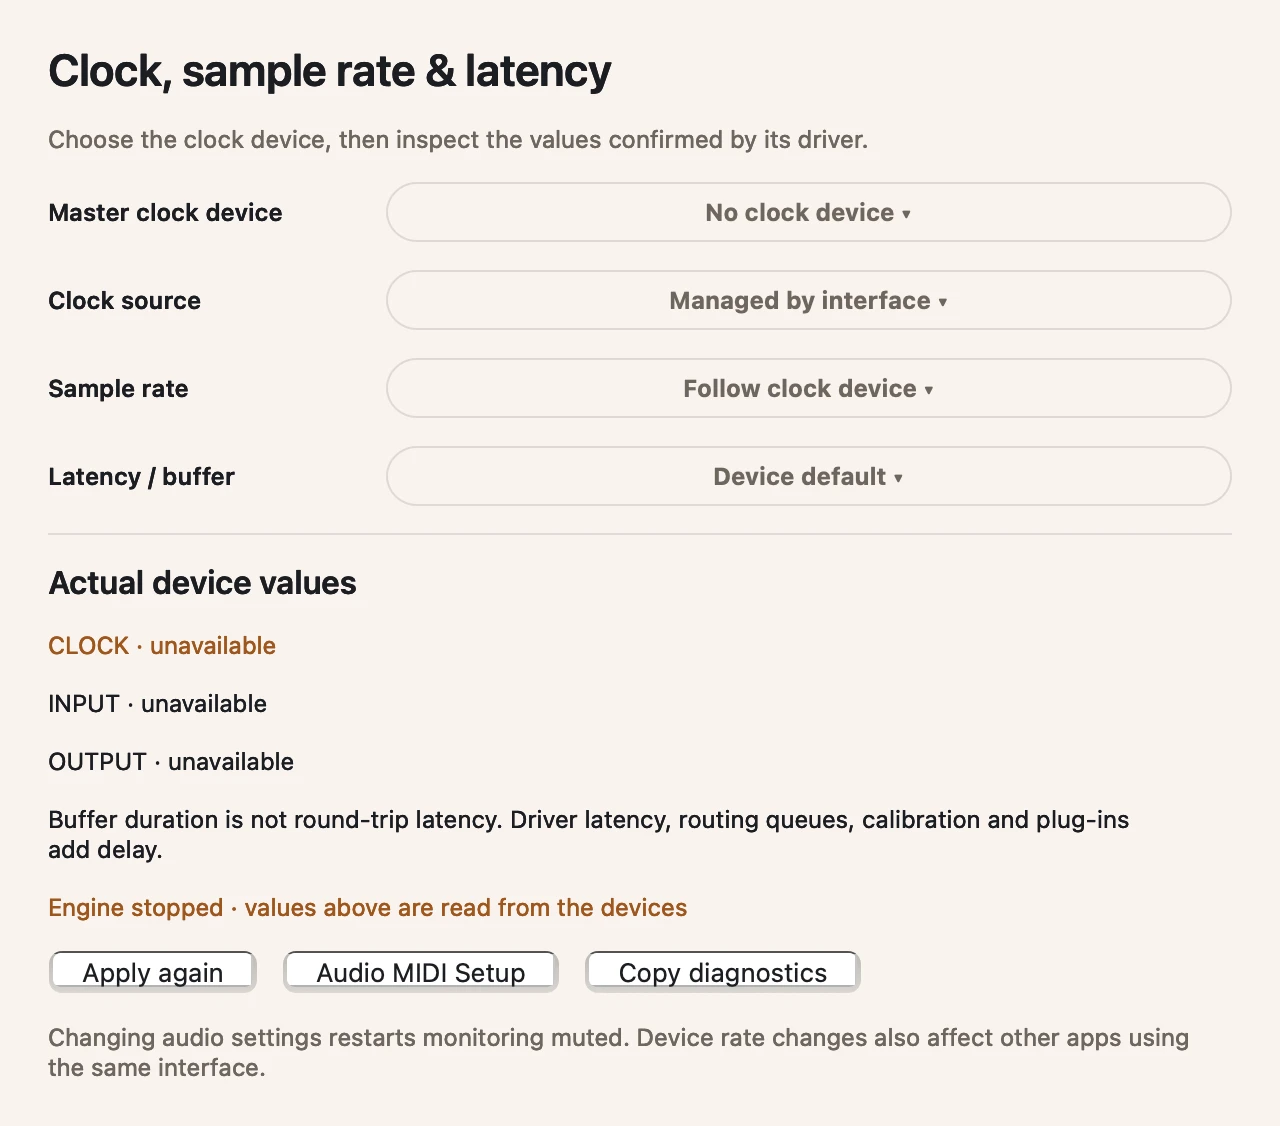
Figure 4: Audio Settings illustration. The Requested / Actual values shown are offline demo data and do not represent your interface.
09.5 Applying changes
Prerequisites: you know what you want to change.
Steps:
- Change the clock, sample rate, or buffer under Settings → Audio Settings.
- Apply. The app mutes with CUT and restarts the engine.
- Re-check the Actual field.
- If Actual differs from what you requested, note the real value and treat it as the truth.
- Release CUT.
Expected result: the Actual field shows the sample rate and buffer the interface really adopted.
When it fails, inspect:
- Actual differs from Requested → note Actual, then check what sample rate your DAW is using. A mismatch between the two is the prime cause of crackling.
- The whole interface stops working after the change → the interface sample rate was changed by the app, and this affects other applications on the same interface. Quit UTUVO Monitor, restore the interface's previous rate, and relaunch the app.
10 Metering and loudness measurement (LUFS)
10.1 The Loudness card
The Loudness card in the main window shows:
| Display | Meaning |
|---|---|
| Integrated | Accumulated loudness since the last reset |
| Short term | Loudness over a short window |
| Range | Loudness range (LRA) |
| True peak | True peak level |
No signal does not display as 0 LUFS — that means "no data", not "silence equals 0 LUFS".
These are digital-level measurements (they read the audio data itself). They are not sound-pressure-level (SPL) measurements at the speakers, and they do not tell you what you actually hear in the room.
10.2 Target selection: SOURCE / MONITOR
The SOURCE / MONITOR switch on the Loudness card decides whether you meter the input signal or the monitored output.
- SOURCE → meters your input material (judging the source).
- MONITOR → meters what actually reaches the output after routing, EQ, and calibration (judging the finished result).
Preferences → Monitoring → METER TARGET offers:
- Follow selection → follows the card's SOURCE / MONITOR switch.
- specific Source → always meters one chosen source.
- specific Monitor → always meters one chosen monitor output.
10.3 On/off and reset
- The LUFS switch turns the meter on and off. There is no separate pause control.
- The reset arrow resets the accumulated value of the currently selected target (SOURCE or MONITOR).
10.4 Platform
The Platform dropdown sets the delivery target (for example a streaming service's loudness specification). It is not a loudness-normalisation feature. Choosing a platform does not push your audio to a target loudness; it only changes the specification you compare your measurements against.
10.5 Reports: the standard report and the album report
The app produces two kinds of output, and their prerequisites differ:
| Report | Prerequisite |
|---|---|
Standard REPORT (.txt and .json) |
You must already have measured blocks (measurement blocks). With no blocks there is nothing to export |
| ALBUM report | You must have track markers, so the report can be segmented by track |
- Option-click (⌥) REPORT → copies the text to the clipboard.
- Right-click → opens the album report menu.
A block is a measurement block, not a track. A block is the measured data itself; a marker is a named segment you create with SET → Loudness → New track.
10.6 Measurement windows
Choose 30 / 120 / 600 seconds.
10.7 Track markers (New Track)
SET → Loudness → New track will:
- Name the current segment.
- Reset the current Integrated run.
10.8 What resets the meter
The following changes reset the meter (deliberately, so numbers from different conditions are never mixed):
- A change of source or monitor identity (a different source or monitor output).
- A change of layout.
- A change of device.
- A change of sample rate.
Do not expect one continuous Integrated number across a whole session. As soon as you change output or sample rate, the accumulation starts over. To compare material, measure it under the same settings.
11 Speaker Check
11.1 What it is for
The speaker check lets exactly one speaker sound at a time, so you can confirm:
- Whether left and right are swapped.
- Whether one speaker is dead, badly cabled, or faulty.
- Whether the channel map is wired to the wrong speaker.
11.2 Opening and basic operation
- Settings → Speaker Check opens the window.
- Click a speaker → that speaker's channel starts playing.
- AUTO → cycles through the speakers automatically, following the layout. AUTO is a toggle (press again to stop), and the window may already be cycling when it opens if that preference is enabled.
- Clicking any speaker manually stops AUTO (manual takes priority).
- STOP → stops playback.
- CLOSE → stops playback and closes the window.
11.3 Signal and parameters
| Parameter | Options |
|---|---|
| Signal | Pink noise (closer to real music energy distribution) / Tone 1kHz (pure tone) |
| LEVEL | Default −20 dBFS, range −40…−6 dBFS, 1 dB steps |
| STEP | 0.5 / 1 / 2 seconds dwell per speaker |
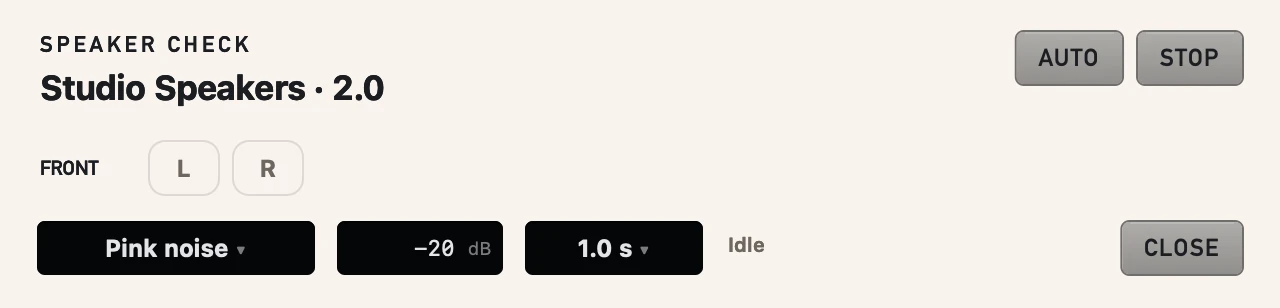
Figure 5: Speaker Check illustration. The speakers and levels shown are offline demo data, not live hardware measurements.
Use the 1 kHz tone to find swaps — a fixed pitch is much easier to place. Use pink noise when you want conditions closer to real work.
11.4 Safety rules: AUTO will not bypass CUT
- The speaker check obeys the main volume and CUT. With CUT lit, the test produces no sound, and AUTO does not release CUT for you.
- The test never auto-unmutes.
- If the engine is off (ENGINE OFF), the window shows that message and does not queue playback for when the engine starts.
The correct order of operations:
- Keep CUT engaged and open the speaker-check window.
- Press STOP first to establish a stopped state — AUTO is a toggle, and the window may already be cycling when it opens if that preference is enabled.
- Set the signal (Pink noise / Tone 1kHz), LEVEL, and STEP.
- Bring the Main VOLUME and the physical level down low.
- Release CUT yourself.
- Click a single speaker, or press AUTO (if it is already cycling, press STOP and then AUTO to restart the cycle).
- Press STOP when you are done.
⚠️ A preference can start AUTO automatically when the speaker-check window opens. If that preference is on, engage CUT before opening the window, because AUTO begins cycling immediately.
11.5 The checking procedure
Prerequisites: speakers are connected; the physical level is at a safe value; the engine is running; microphone permission has been granted.
Steps:
- Engage CUT.
- Open the window with Settings → Speaker Check, and press STOP first to establish a stopped state.
- Choose Tone 1kHz, LEVEL −20 dBFS, STEP 1 second.
- Confirm the main volume and the physical level are both low.
- Release CUT yourself, press AUTO (STOP first if it is already cycling), and walk around the room noting each position.
- Press STOP.
Expected result: each speaker sounds its 1 kHz tone in turn, in the position your physical setup implies.
When it fails, inspect:
- No sound → is CUT still lit? Is the engine OFF? Is that output's status in the Output list correct? Is it muted, corrected, or held down by a processing bus or a channel conflict? Rule out these app-side causes first, then look at the wiring.
- One speaker is completely silent → test with another output or another channel to confirm the problem is on that path; once the app side checks out, check the cable and the socket with CUT still engaged.
- Sound comes from the wrong speaker → check the OUTPUT channel mapping first, then look at the Source side. When a speaker is wired to the wrong socket, the thing to fix is the output mapping, not the Source.
11.6 Atmos Room Check
For a direct 7.1.4 output, open Settings → Speaker Check → ROOM CHECK. Choose a measurement microphone and fix its position at your listening spot. At a safe monitoring level, use Measure Normal and save the baseline only after confirming all twelve channels. Use Retest with the same setup to see missing test responses and level changes on each channel.
To compare delay, use a timing loopback on the same capture interface as the microphone. If the timing reference is unavailable or unreliable, the delay is left blank. A probe sent to multiple ports, for example by bass management, is marked as not comparable.
12 Renderers and HRTF (SOFA)
12.1 What a renderer is
A renderer converts the app's signal into a particular spatial format. This build provides:
| Option | What it is |
|---|---|
| Off / Direct | No rendering; the signal passes straight through |
| Dolby fold | Folds multichannel down using Dolby's fold rules (this is a fold — not Atmos encoding or Atmos mixing). It can be applied to other output layouts, and to other active Main outputs whose mappings and slots are valid |
| Apple Spatial | Works with Apple's spatial audio formats |
| UTUVO Room | UTUVO's own spatial rendering |
When the output has fewer speakers than the source (for example a 5.1.2 source on a 4.0 output): Off / Direct sends only the speakers that exist in both layouts by name (L R Ls Rs) and drops the rest (C, LFE, Ltm, Rtm). Dolby fold keeps everything: C goes to L and R at −3 dB, Ltm/Rtm go to Ls/Rs at −3 dB, and with the default Direct LFE profile the LFE goes to L and R. For a narrower output, use Dolby fold.
12.2 Limitations
| Limitation | Explanation |
|---|---|
| Primary output only (Apple Spatial / UTUVO Room only) | Those two renderers apply to the primary output only; Dolby fold has no such limit |
| The output must be a stereo pair (Apple Spatial / UTUVO Room only) | Those two renderers need a left/right pair as their output layout and mapping; your physical interface may itself have many more channels |
| Apple layout tag | Applies to Apple Spatial only: without the correct Apple layout tag, Apple Spatial is unavailable |
| Head tracking / Personalized | Greyed out when permissions or device capability are missing |
A SOFA file holds HRTF (head-related transfer function) data — the acoustic differences a pair of headphones creates around the head. It is not room-measurement data, and this app has no microphone-based room measurement procedure.
12.3 SOFA files
- A default MIT KEMAR HRTF set is bundled with the app and can be used straight away.
- You can also load your own SOFA file. Personal SOFA files are not bundled — you supply them and keep them on your own machine.
- If the file is missing, the feature is unavailable — the app does not invent HRTF data.
- This manual makes no claim about the accuracy of any particular HRTF set.
12.4 What the microphone is for here
Room measurement is not a feature of this app. Microphone permission exists because the app captures its audio source (including virtual input devices) — see 03.1; no physical microphone hardware is required. Head tracking and Personalized additionally require motion or related permissions, and are greyed out when unsupported.
13 Headphone EQ
13.1 When to use it
Headphone EQ can process eligible Main-role stereo outputs. When its status is Active, it applies a 10-band correction before the signal leaves the app.
Headphone EQ does not detect whether headphones or speakers are attached. As long as the Output is a Main role with a valid distinct physical left/right map, it may apply — including to speakers wired to that same Output. Confirm the actual status below.
13.2 Conditions for availability
Headphone EQ requires:
- The output role is Main.
- There is a distinct physical left/right stereo pair, within valid range.
The status word tells the whole story:
| State | Meaning |
|---|---|
| Active | Enabled and in effect |
| Bypassed | Disabled or no curve loaded; not processing |
| Unavailable — reason | Output requirements are unmet, the curve was rejected, or the stage is inactive; inspect the stated reason |
| Enabled — not applied | Enabled, but not applied (the interface gives the reason) |
Flipping the switch to "on" does not mean it is working. Read the state word and confirm it says Active.
If an older configuration displays Unavailable — Cue is live on channel…, historical Cue channel data is triggering a conflict message. Cue is archived in this build, so there is no available Cue control to disable it. Keep CUT engaged and restore a known-good configuration as described in Chapter 19, or export diagnostics for support.
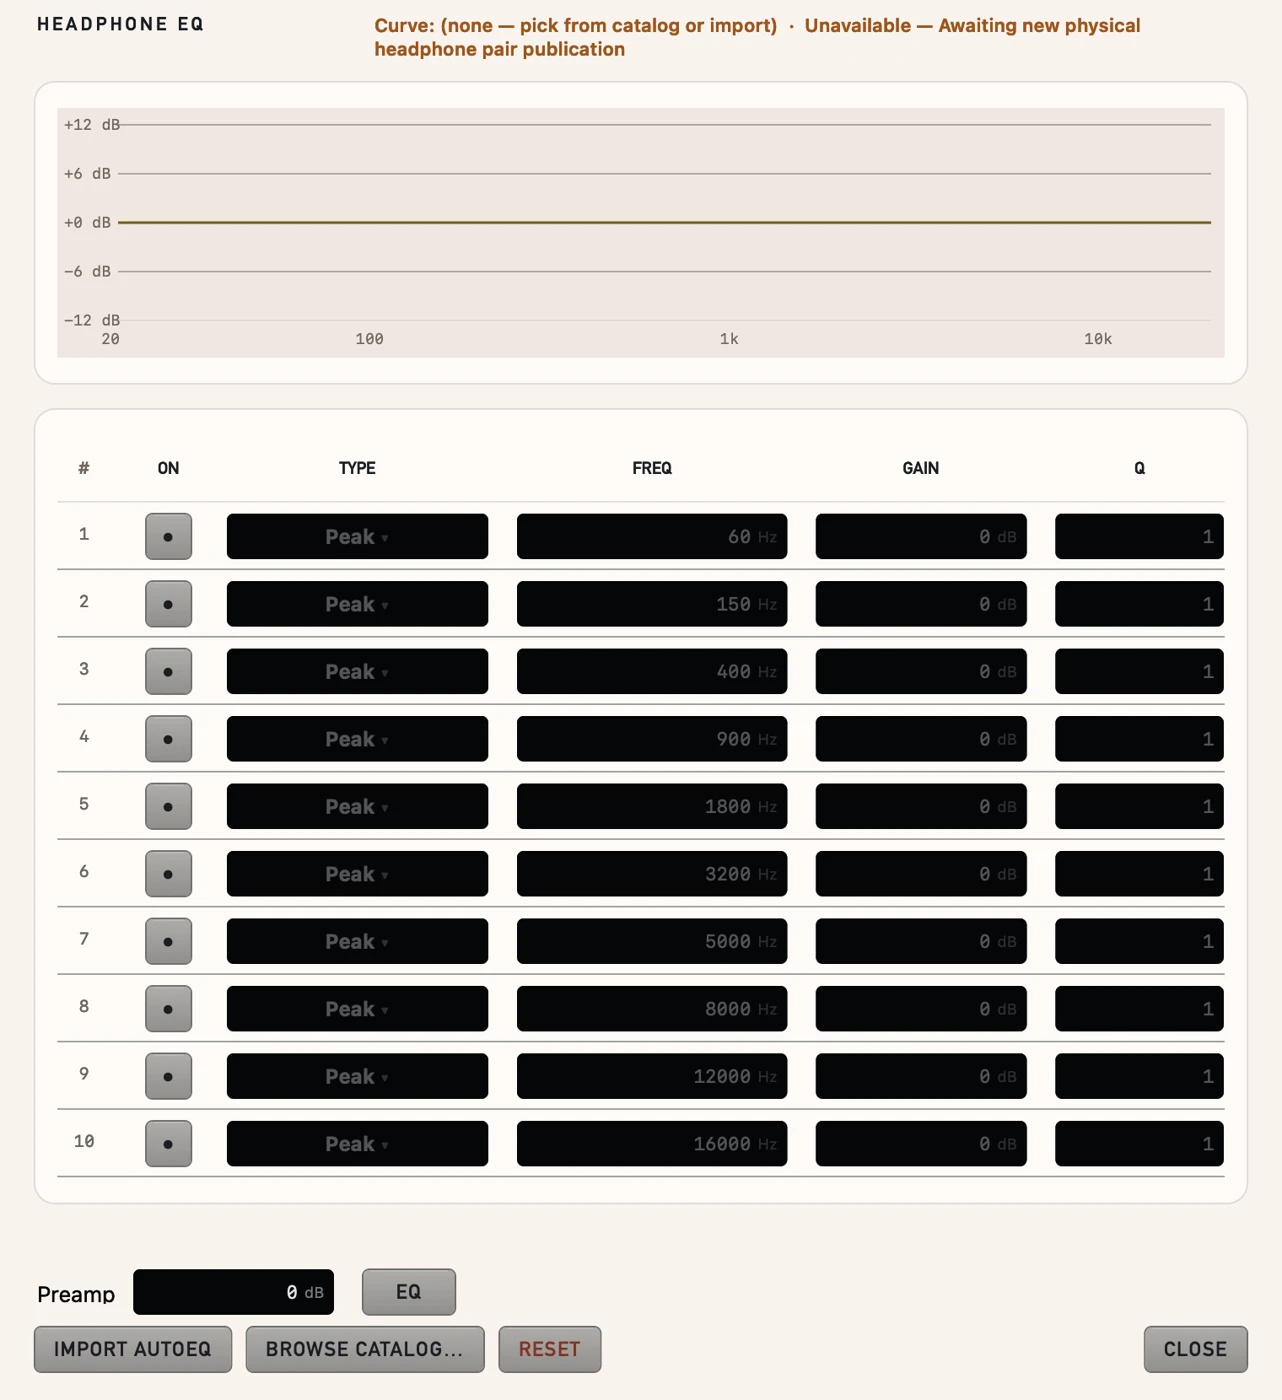
Figure 6: Headphone EQ panel illustration. The curve and values shown are offline demo data and do not represent measurements of any headphone.
13.3 Using it
- Select your headphones as the primary output.
- In that Output's own SET → HEADPHONE / HP EQ → Edit panel, press Browse Catalog and choose a curve matching your headphone model. If your model is not listed, use Import AutoEq with your own AutoEq file.
- Adjust Preamp and the 10 bands.
- Confirm the state reads Active.
Expected result: the output level changes according to the Preamp setting (down when you lower it, up when you raise it), and the same band parameters are used for both left and right — one single 10-band curve shared by both sides.
When it fails, inspect:
- State is not Active → check that the output is a Main role and that a distinct physical left/right pair exists.
- The result is far too quiet or too loud → adjust the Preamp instead of reaching for the physical volume.
- Left and right sound asymmetric → Headphone EQ has no independent left/right correction: both sides share one 10-band curve. Check the source, channel map, and equipment; this feature cannot correct the two sides independently.
Apply one curve only. Do not stack your own measurement on top of somebody else's corrected curve — that makes the correction meaningless. Use a curve that matches your headphones.
14 Plug-ins (Source FX / Output FX)
14.1 Two rack locations
| Rack | Position in the signal path |
|---|---|
| Source FX | Before the signal enters the main mix |
| Output FX | After the main mix, before the output |
Each rack holds up to 4 Audio Units.
14.2 Available operations
- Bypass — the effect stays loaded but the signal does not pass through it.
- Reorder — changes the order of the chain (order changes the result).
- Remove — takes the effect out of the chain.
14.3 Compatibility
Whether an effect works depends on the Audio Unit's bus type, your channel layout, and whether that effect errors under that layout.
- The app reports an error when an effect is not applicable, rather than letting you monitor broken audio.
- If an output's processing bus is incomplete, the engine mutes that bus or refuses to apply it, and the output itself may still remain ACTIVE (see 08.2).
Do not assume any third-party effect will work. Every Audio Unit has to be tested in your actual channel configuration.
15 Calibration and bass management
15.1 Calibration
Output Settings → CALIBRATION offers three actions:
| Action | What it does |
|---|---|
| Edit | Left side selects the speaker; right side edits that speaker's 10 bands plus DELAY, LEVEL, and phase |
| Import | Imports a correction file, applied to the currently selected speaker |
| Import all | Scans a folder and applies files to speakers by name |
15.2 Supported import formats
This manual teaches only verified UTF-8 plain-text filter files, for example:
- REW filter text
AutoEqParametricEQ.txt- generic correction text
⚠️ Back up your current settings before importing, and keep CUT engaged during the import. After importing, check that speaker's band count, frequency, gain, Q, delay, level, and polarity before you release CUT and start listening.
✅ From build 55 the import validates the file first and refuses anything that carries no recognisable correction:
- Empty files, comment-only files, plain text, CSV, OFF-only and unsupported-filter-only files → the import is refused and that speaker keeps its previous settings completely.
- A known directive with an invalid format or value (a missing or non-numeric number,
Invertthat is not yes/no/true/false/on/off, a broken filter of a supported type) → the whole file is refused; half a correction is never applied.- An explicit
0(for examplePreamp: 0 dB) is a valid value and imports normally.- A valid file still replaces the currently selected speaker's correction (delay, level, polarity, bands), so back up, keep CUT engaged, and check the parameters still apply.
15.3 Supported filter types
Preamp / Delay / Gain / Invert, plus switchable Peak / Low Shelf / High Shelf.
- Filters that cannot be read, or that are marked OFF, are skipped.
- Supported ranges: frequency 20 Hz–20 kHz; gain −18…+18 dB; Q 0.1–10; Delay 0–100 ms; Level −24…+12 dB.
15.4 The Import all filename rule
- Scans
.txtfiles in the folder. - Filenames must match speaker labels, case-insensitively (for example
L.txt,R.txt). - The interface reports
Imported N; skipped <filenames>. The skipped list gives you the filenames only — it does not explain each skip individually. - Each file is applied on its own: valid files import successfully; a refused file keeps that speaker's previous settings and is listed as skipped.
15.5 How calibration takes effect
- A successful import enables that speaker's correction and turns CALIBRATION on.
- An import that is refused (no recognisable correction, or a known directive with an invalid format or value) keeps the previous settings completely — not a single parameter changes (see 15.2).
- Status words:
n/N speakers corrected→ n speakers corrected out of N, followed by the filename and date.0/N speakers corrected (off)→ calibration is switched off.
⚠️ An invalid correction can silence the affected outputs. Verify the imported parameters first, lower the monitoring level, then follow the safe procedure in Chapter 11 to check each speaker.
15.6 Bass management
The BASS MGMT master toggle. When enabled you can configure:
| Section | Items |
|---|---|
| Speakers | ON (bass management for this speaker: high-pass it and send the removed bass to the Subs ticked in SEND TO SUBS), S (Solo), M (Mute), Ø (polarity), HP (high-pass), SLOPE, SEND TO SUBS A–D, LP (low-pass), SLOPE, DELAY |
| Sub A–D | S (Solo), M (Mute), phase (polarity invert), Level (−24…+12 dB, 0.5 dB steps), Delay (0–100 ms, 0.5 ms steps), Output (None / interface channel) |
S means Solo and M means Mute — not Stereo and Mono. Phase is a polarity inversion.
-
Switching a speaker's ON on sends its bass to the Subs automatically: every Sub that has an Output, or Sub A when none has one yet. The A–D cells light up so you can see where it goes. To keep a speaker high-pass only, switch its A–D cells off; the app does not switch them back on.
-
An older setup that had speakers ON but no send at all (the bass was removed and went nowhere) is upgraded once, the first time this version starts.
-
A speaker row's S / M are the same per-speaker Solo / Mute as the Room card (they stack). Ø flips the polarity of L / R (the same setting as the desk); speakers without a polarity setting show Ø greyed out. These act on the currently selected Output.
-
A Sub's S lets you hear that Sub alone (the speakers are muted), for setting the Sub's level and phase. It is cleared every time the app starts and on Scene recall.
-
When BM is off or locked, these controls are disabled (greyed out). This prevents you from editing parameters that are not in effect.
-
HP / LP range: 20–500 Hz, 5 Hz steps.
-
Slope options: BW (6 / 12 / 18 / 24 / 30 / 36 / 42 / 48 dB/oct) and LR (12 / 24 / 36 / 48 dB/oct).
-
Each send's gain: −12…+3 dB, 1 dB steps; switching a send off and on again preserves its stored level.
-
The LFE row has no HP (LFE is already the lowest band).
-
LFE FILTER toggles bypassing the LP on the LFE row; it is not a fixed 120 Hz filter.
-
A Sub Output may be the LFE speaker's own channel (the usual wiring: sub on the LFE jack). That channel then carries the Sub: the LFE plus any redirected bass. Other speaker channels are refused ("in use").
-
Turning BM on with no Sub output set puts Sub A on the LFE channel automatically.
-
If the Sub setup cannot work (two Subs on one channel, a Sub on a speaker channel, incomplete output binding), BM is bypassed: speakers keep playing full range and the Output shows the reason. It does not silence the Output.
Keep two things apart: redirecting bass to subs and the programmed LFE channel are different features. The app does not automatically redirect rhythmic bass, and it does not add any automatic gain compensation.
16 Scenes
16.1 What a Scene stores
A Scene stores:
- The complete routing (source, output, satellites).
- Monitoring state (main volume, DIM, Mono / Mid / Sides, phase, Flip LR).
- Loudness platform and layout.
- The main volume value.
16.2 Commands
From the Scenes menu:
| Command | Effect |
|---|---|
| Save as | Store the current state as a new Scene |
| Update | Overwrite an existing Scene with the current state |
| Rename | Rename |
| Delete | Delete |
| Set as A | Assign to slot A |
| Set as B | Assign to slot B |
| Compare | Compare A against B |
16.3 A/B level matching
The SET menu has a level match option: when you recall slot B, the app aligns the level using the already-measured Integrated LUFS difference, and the correction is clamped to ±12 dB.
- If either A or B lacks a finite measured Integrated LUFS value, recalling is an ordinary Scene recall and no level compensation happens.
- This is a digital level match, not a physical SPL calibration. Two different speakers may still differ in real sound pressure level; true SPL alignment needs a sound level meter and measurements.
16.4 Recalling a Scene triggers CUT
Every Scene recall triggers CUT, even when the device has not changed.
- A Scene changes routing, and changing routing can briefly overlap different signals. This is a deliberately conservative design.
- The engine only restarts when rebinding (input or output) actually requires it; when the routing is unchanged, the state is usually simply re-applied.
Standard procedure:
- Engage CUT first (if you are not already muted).
- Recall the Scene.
- Confirm the actual source, output, and level.
- Raise the physical level slowly and release CUT.
17 Macros
17.1 What a Macro is
A Macro is a set of actions you trigger at once. For example: "recall Scene A → set the volume to −18 dB → show the MONITOR meter".
17.2 Editing
Macros → Edit Macros:
- 16 slots.
- Up to 6 actions per Macro.
- Name, colour, and actions autosave — there is no separate save step.
17.3 Available actions
| Category | Can invoke |
|---|---|
| Scenes | Recall any Scene |
| Source | Switch to a given source |
| Output | Switch to a given output |
| Safety | CUT (mute / unmute) |
| Level | Main volume |
| Monitoring | Mono, Fold |
| Display | Metering-related switches |
In a Macro, DIM is only an on / off / toggle action — there is no "set DIM to −12 dB" action. The correct sequence is: set the attenuation amount on the main DIM control first (say −12 dB), then let the Macro's DIM action switch it on.
17.4 ⚠️ Macros can unmute
Macros carry full control authority: they can release CUT and can raise the volume to 0 dB.
When you build a Macro for the first time, inspect every action individually and confirm each one is something you actually want. Pay particular attention to "release CUT" and to the level actions; do not put them into a Macro whose contents you are unsure about.
17.5 Examples
"Recording room" Macro (within 6 actions):
- Recall the Scene "Recording".
- Main volume → −20 dB.
"Mix review" Macro:
- Recall the Scene "Mix".
- DIM → on (set the attenuation amount on the main control first, e.g. −12 dB).
- Meter target → MONITOR.
Never put "release CUT" into a Macro that a remote device can trigger, unless you fully understand the consequence.
18 Remote control: MIDI, OSC, Stream Deck
18.1 Remote Controllers overview
Settings → Remote Controllers is the entry point for every external control:
- Connect / Disconnect.
- Choose the MIDI input device, Any channel, or channel 1…16.
- MIDI's Disconnect affects only the MIDI link; OSC's Disconnect also stops the Remote and the Stream Deck along with it.
18.2 MIDI mapping
Settings → MIDI Mapping, or right-click a control → MIDI Learn.
| Mode | Behaviour |
|---|---|
| Toggle | Switches on each press |
| Momentary | Active only while held |
| Absolute | The controller carries the value directly |
| Relative 2s Complement | Relative encoder movement: the encoder sends how much it moved, with the direction expressed as a two's-complement number |
| Binary Offset | The other relative encoding: the direction is expressed as a binary offset value |
- Esc cancels an in-progress MIDI Learn.
- Export / Import: JSON format.
- Merge → keeps the other rows, and a duplicate with the same message / source / channel is replaced by the incoming one.
- Replace → clears all previous rows and keeps only the imported ones.
- Clear / Clear all → take effect immediately.
This build supports more modes than the older documentation listed. The old MIDI guide is outdated; this manual is authoritative.
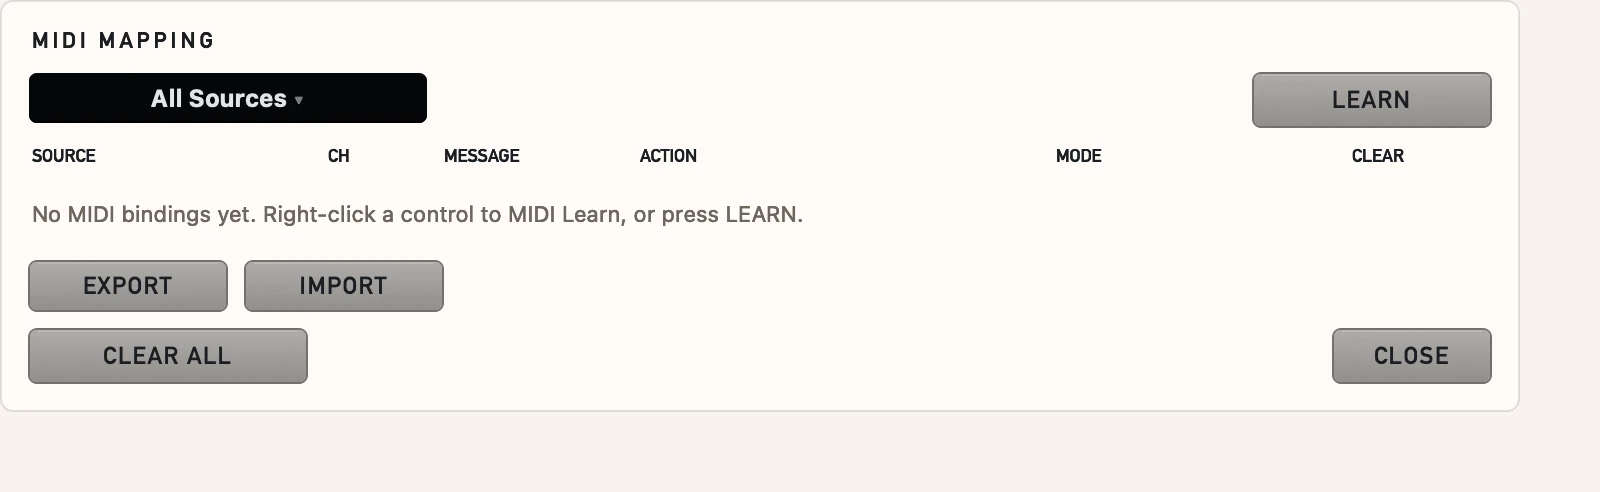
Figure 7: MIDI Mapping illustration. The messages and controls shown are offline demo data.
18.3 OSC
In the SET menu:
- OSC On / Off
- Allow remote devices (Bonjour) → lets devices on the local network connect.
- OSC Ports → port settings. Defaults: UDP 41234 listen, 127.0.0.1:41235 send.
Prerequisites for LAN use: OSC must be on and Allow remote devices (Bonjour) must be on. Both are required.
18.4 Stream Deck
- Stream Deck connects over WebSocket, and the port is dynamic.
- The app shows the endpoint and offers a Copy Endpoint button — copy the endpoint as it is at that moment rather than hard-coding a port.
The Stream Deck plug-in is a separate package, installed independently of the app. It is not necessarily included in the app's DMG — use the files you actually received.
18.5 Authority and safety
Repeating the three rules from 04.5:
- Remote / Stream Deck / Macro can release CUT and raise the volume to 0 dB.
- Use them only on a private network you trust.
- Do not forward the UDP port to the public internet.
19 Preferences, appearance, and settings backups
19.1 Map of the menus
| Location | Contents |
|---|---|
| Settings → Preferences… (⌘,) | Preferences (monitoring, METER TARGET, and similar) |
| Settings → Hot Keys | Global hot keys: you assign a control and a key combination yourself, and they work anywhere in the app |
| Settings → MIDI Mapping | MIDI mapping |
| Settings → Configuration | Settings save policy and backups |
| Settings → Speaker Check | Speaker check |
| Settings → Remote Controllers | Remote controllers |
| Settings → Audio Settings | Latency, Master Clock & Sample Rate, Sample Rate, and similar |
| Settings → Software Updates | Software update checks |
| Help (top-level menu) | UTUVO Monitor Help, Export Diagnostics, Reveal Log Folder |
| SET (gear) → Theme | Appearance theme |
Help is a top-level menu, not part of Settings. Theme lives under the main window's SET gear, not in the Settings menu.
19.2 Appearance
SET → Theme:
- UTUVO Light
- Noir
- Satin Silver
- Midnight Studio
Accent Color (independent of the theme): Studio / Blue / Green / Teal / Violet.
Scaling: 50 / 75 / 100 / 125 / 150 / 200 %.
Typeface is adjusted in Preferences.
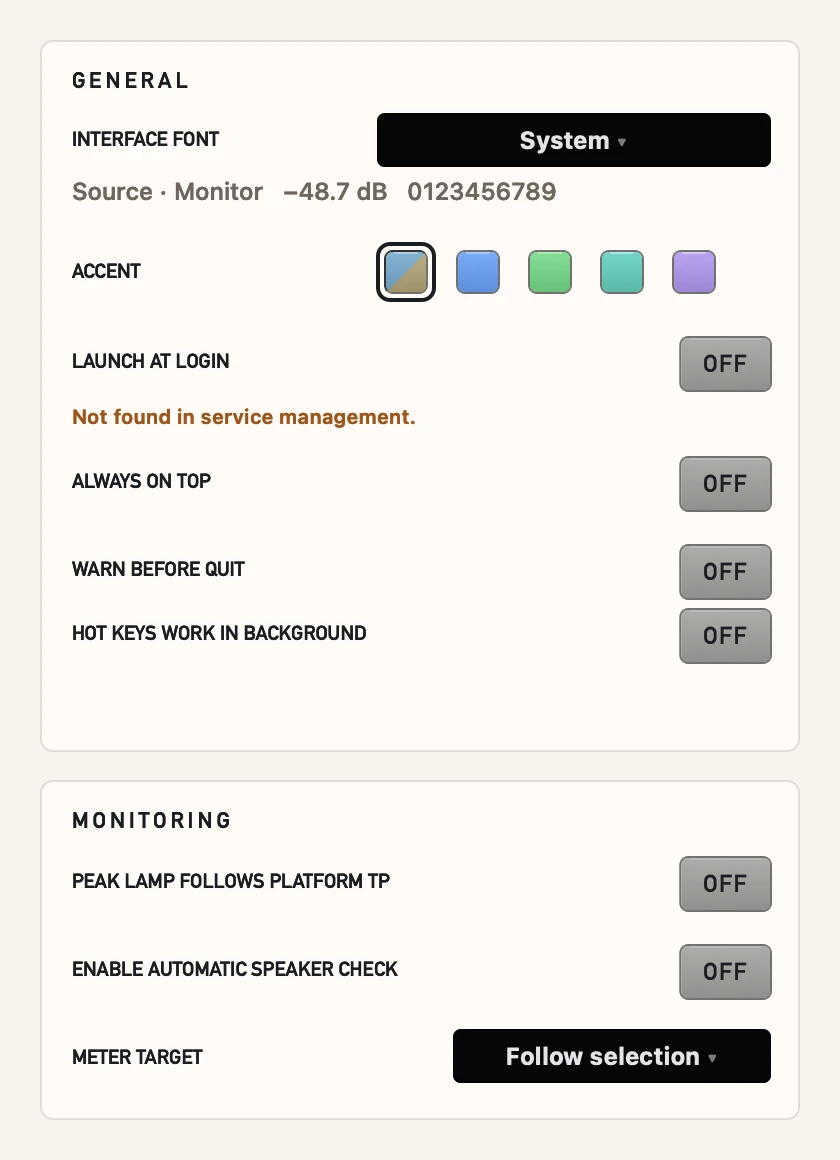
Figure 8: Preferences and appearance illustration. The options and values shown are offline demo data.
Appearance changes never alter your audio routing or volume. Changing the theme will not invalidate your Scenes and will not change what you are listening to.
19.3 Spatial display appearance
Chips, Speakers, and Room 3D appearance settings affect how they are drawn only, not audio processing.
19.4 Configuration: when settings are written
Settings → Configuration offers three storage policies:
| Actual label | Behaviour |
|---|---|
| Save changes continuously | Writes changes immediately |
| Save configuration on quit | Writes when you leave the app |
| Don't save automatically | Does not write automatically (you save manually) |
19.5 Periodic version backups (different from the settings save policy)
| Command (actual label) | Behaviour |
|---|---|
| Save configuration now | Writes the current settings immediately |
| Create version backup | Creates a version backup |
| Restore version backup | Schedules a restore of a version backup |
| Item | Value |
|---|---|
| Version backup interval | Off / 1 / 5 / 10 / 30 minutes |
| Versions retained | 10 / 20 / 50 / 100 |
These are two different things. The settings save policy decides how often your settings are written to disk; the version backup interval decides how often a rollback point is produced, and the retained count decides how many are kept. They are independent of each other.
Restore behaviour:
- The restore is scheduled for your next launch, not applied instantly.
- A backup of the current state is taken before the restore runs.
- You can cancel a scheduled restore.
⚠️ This settings backup is not a full backup of everything. It mainly covers the settings themselves; named Scenes, Macros, and MIDI mappings are stored separately and have to be kept separately. And the backups live inside
~/Library/Application Support/UTUVO Monitor— delete that folder and the backups go with it. Copy them out before deleting (see 22.2).Your own external SOFA files, Audio Units, plug-in packages, and drivers are outside the backup scope entirely. Copy those separately.
19.6 Control range reference
| Control | Range | Step |
|---|---|---|
| Output speaker VOL | −24…+12 dB | 0.5 dB |
| Bass management DELAY | 0–100 ms | 0.5 ms |
| Headphone EQ Preamp | −24…+12 dB | 0.1 dB |
| Headphone EQ / calibration FREQ | 20 Hz–20 kHz | — |
| Headphone EQ / calibration GAIN | −18…+18 dB | 0.1 dB |
| Headphone EQ / calibration Q | 0.1–10 | 0.05 |
| Calibration DELAY | 0–100 ms | 0.1 ms |
| Calibration LEVEL | −24…+12 dB | 0.1 dB |
20 kHz is the interface's display ceiling; it does not mean every sample rate can process 20 kHz. An active Headphone EQ frequency must stay below the Nyquist frequency (half the sample rate); calibration treats anything above 0.49 × the sample rate as identity. Do not expect 20 kHz correction at 16 kHz.
19.7 File locations
| Content | Path |
|---|---|
| Settings (including backups) | ~/Library/Application Support/UTUVO Monitor |
| Logs | ~/Library/Logs/UTUVO Monitor |
20 Troubleshooting
20.1 Quick check order
For any "no sound" or strange problem, work through this order:
- Is microphone permission granted? Without it the engine cannot start at all (03.1).
- Is CUT lit? If it is, do not release it until the physical level is at its minimum.
- Are the Source / Output in the main window the devices you want?
- What is the Actual sample rate in Audio Settings? Does it match your DAW?
- Run the speaker check speaker by speaker → this separates "the output chain is broken" from "there is no signal at all".
- Export a diagnostic report (see 20.3).
20.2 Symptom table
| Symptom | Likely cause | How to check | What to do |
|---|---|---|---|
| The engine will not start; the app seems dead | Microphone permission denied | System Settings → Privacy → Microphone | Grant it, then fully relaunch the app |
| No sound at all | CUT is still engaged | Look at the top-bar CUT indicator | Lower the physical level, then release CUT |
| No sound at all | Physical level / speaker power | Use the speaker's own knob and power switch | Power on, turn the level up |
| No meter signal | Wrong source selected, or nothing is playing | Check the device name on the Source tile | Select the correct DEVICE (for a virtual source, choose UTUVO 2) |
| No meter signal | Sample-rate mismatch | Read the Actual field in Audio Settings | Make the app and DAW use the same rate |
| Crackling or dropouts | Buffer too small | Switch to Device default or a larger value | Applying restarts with CUT |
| Crackling or dropouts | The interface changed the rate | Read the Actual field | Treat Actual as truth and reset the interface |
| Sound on one side only | Left/right mapping wrong | Test each side with the speaker check | Fix the channel mapping or the cabling |
| Left and right swapped | Mapping reversed | 1 kHz tone test | Check the Output side first, then the Source side |
| One speaker silent | Not necessarily hardware: routing, mute, calibration, or a channel conflict may be the cause | Check the Output status, CUT, and that channel's correction | Rule out app-side causes first, then check the cable and socket with CUT still engaged |
| Speaker check produces no sound | CUT is lit, or the engine is OFF | Check the CUT indicator and the window message | Release CUT, start the engine |
| Speaker check starts cycling on its own | The automatic Speaker Check preference is on | Check Preferences | Engage CUT before opening the window |
| No sound after switching devices | The engine is restarting | Look for "restarting" in the top bar | Wait for the restart, then release CUT |
| Other apps become audible after releasing CUT | Releasing CUT clears hardware mute set elsewhere | Check whether the interface is shared | Lower the shared interface level, or use an unshared output |
| Other apps break after a sample-rate change | The app changed the interface rate | Read the actual rate on the interface side | Quit the app and restore the interface's previous rate |
| Remote triggers sudden loud output | A remote can release CUT and reach 0 dB | Review the remote mapping | Disconnect the remote control first |
| MIDI buttons do nothing | Wrong mapping mode or no source selected | Check the mode in MIDI Mapping | Re-create it as Toggle or Momentary |
| MIDI Learn cannot be cancelled | Still in learn mode | — | Press Esc |
| A Scene recall changes more than expected | Scenes include routing and volume | Open the Scene and inspect it | Use Update, or Save as again |
| Meter numbers reset unexpectedly | Source, output, or rate changed | Check the status bar | Measure again under fixed settings |
| REPORT has nothing to export | No measurement blocks yet | Check whether any block was produced | Measure something first, then export |
| ALBUM report has no segments | No track markers | Check whether you created a New track | Create a marker, then export |
| Headphone EQ has no effect | The state is not Active | Read the state word | Confirm the output role and the physical left/right pair |
| A speaker goes silent after importing calibration | Invalid correction parameters or rejected output processing | Keep CUT engaged; inspect the correction parameters and Output status | Restore a verified backup, then follow the safe check in Chapter 11 |
| Correction disappears or the level changes unexpectedly | The imported file is valid, but its content differs from your previous correction (an import replaces the current speaker's correction, see 15.2) | Check band count / frequency / gain / Q / delay / level / polarity | Restore the backup and use filter text whose format you have checked |
| A Macro makes the volume jump | The Macro contains a volume or unmute action | Open the macro editor | Remove that action |
| A Macro's DIM does nothing | A Macro can only switch DIM on/off | Check the DIM attenuation amount | Set it on the main control first |
| The app will not launch | Version mismatch | Check the macOS version and the chip | Apple Silicon and macOS 14+ are required |
20.3 Exporting diagnostics
Help → Export Diagnostics packages:
- The report file
- Event records
- The engine tail log
- The current routing
- Available console information
- Up to three crash reports
The report contains no recorded audio. That is a deliberate privacy guarantee.
Help → Reveal Log Folder opens ~/Library/Logs/UTUVO Monitor in Finder.
⚠️ The diagnostic report contains your device names, routing configuration, and file paths. Read it yourself before sending it to anyone, including UTUVO support.
20.4 Audio Black Box
Choose Help → Audio Black Box… → Start Watching before a session. If you hear a dropout, click the waveform in the menu bar. The timeline shows device events from the preceding 30 seconds and adds events from the next 15 seconds. It retains up to ten marks in this session. Events can help you decide what to check next. They do not establish the cause of a dropout. Audio is not recorded.
21 Glossary
| Term | Meaning |
|---|---|
| Actual | The setting the device actually adopted (contrast with Requested) |
| AU / Audio Unit | The macOS audio plug-in format |
| Auto-assign | The button that generates a channel map from LAYOUT |
| Block (measurement block) | A measured block of loudness data; the standard REPORT needs it |
| BM / Bass Management | Crossover, slope, sub redirection, and alignment |
| CUT | The safety mute; it only guarantees that UTUVO Monitor's own engine output is muted, not other applications sharing the interface |
| DIM | An extra attenuation below the current level (default −20 dB) |
| Dual Mono / Mono / Mid / Sides | Mono monitoring modes. Currently Mono and Mid are both (L+R)/2; Sides differs |
| Fold | Folds a multichannel field down to fewer channels (Dolby fold is one such rule set) |
| HRTF | Head-related transfer function — the data a SOFA file holds |
| Integrated | The accumulated loudness value |
| LUFS | Loudness units relative to full scale |
| LFE | Low Frequency Effects — the sub channel |
| Main / Primary | The primary output: always included in the active outputs and unable to be deactivated by its lamp, but not necessarily audible |
| Marker (track marker) | A named segment created with New track; the ALBUM report needs it |
| Phase / Flip LR | Phase inversion and left/right swap; global settings persist across monitoring changes |
| REF | The reference level slot (recalling it does not release CUT) |
| Requested | The setting you asked for |
| Satellite | Another interface used as an additional output (cross-interface is a direct path and gets no Dolby fold) |
| Scene | A one-click snapshot of state |
| SOFA | The file format that stores HRTF data (not room-measurement data) |
| Source / Monitor | The two metering targets: source signal vs monitored output (both digital measurements) |
| True peak | True peak level |
| FLIP LR | Left/right swap |
22 Support, uninstall, and the limits of this build
22.1 Getting more help
- Website: utuvo.app
- Downloads: utuvo.app/downloads
- Support email: support@utuvo.app
This manual ships offline with the installer. Read the HTML in your default browser or the PDF in a PDF reader such as Preview; neither needs a network. After exporting a diagnostic report, include a summary of the report in your message, along with your interface model, macOS version, app version (0.4.0 build 62), and reproduction steps.
22.2 Uninstalling
Back up first, then delete. The order must not be reversed.
- Quit UTUVO Monitor.
- Copy anything you want to keep into a folder outside
~/Library/Application Support/UTUVO Monitor:- the configuration and its backups,
- named Scenes,
- Macros,
- MIDI mappings,
- your own external assets (SOFA files, Audio Units, plug-in packages, and so on). Open the copies and confirm the contents are there — do not rely on the copy command alone.
- Move UTUVO Monitor.app from Applications to the Trash.
- To remove settings and logs as well, delete these two folders:
~/Library/Application Support/UTUVO Monitor~/Library/Logs/UTUVO Monitor
⚠️ Deleting the app and Application Support does not guarantee that every preference is removed. Some preferences can remain in the macOS preferences domain, and this manual documents no procedure for clearing that domain. Do not delete unrelated drivers or system files in order to clean up one app — other components depend on them.
22.3 Limits of this build (please confirm these)
| Item | Status |
|---|---|
| Cue mixes / Cue A–D | Archived — not available in this build. Older documentation and some plug-in actions still mention them, but the feature does not exist |
| Talkback | Archived — not available in this build |
| Avid EUCON control | Not implemented |
| Network audio streaming | Not provided in this build, and not promised |
| Remote app | Not included in this installer. This manual does not describe how to obtain it or its store status |
| Room measurement calibration | This build has no microphone room-measurement procedure. SOFA holds HRTF data, not room measurements |
| Atmos encoding / Atmos mixing | Outside the scope of UTUVO Monitor (Dolby fold is a fold, not an encoding) |
| Apple Spatial / UTUVO Room | Primary output only, and the output layout / mapping must be a stereo pair; Apple Spatial additionally needs the Apple layout tag |
| Dolby fold | Not subject to those two limits: it supports other output layouts and can be applied to other active Main outputs with valid mappings and slots; cross-interface satellite outputs stay direct |
| SOFA files | A default MIT KEMAR HRTF set is bundled; personal SOFA files are loaded from your own path and are not bundled |
| Calibration import | Fixed from build 55: a file with no recognisable correction, or a known directive with an invalid format / value, is refused and the speaker keeps its previous settings completely; a valid file still replaces the current speaker's correction (see 15.2) |
| Stream Deck plug-in | A separate package, not necessarily shipped in the DMG |
| Room 3D appearance | Appearance only; no effect on audio |
22.4 About measurement and numbers
- The meters and SOURCE / MONITOR are digital-level measurements, not physical sound pressure level.
- A/B level matching is a digital match (and it needs prior measurements, and is limited to ±12 dB), not SPL calibration.
- Scenes record the level you had at the time; different Scenes can carry different loudness references.
- Calibration depends on the correction data you supply. Keep CUT engaged, verify the imported parameters, lower the monitoring level, then follow Chapter 11 to check each speaker safely.
22.5 Version information
| Item | Value |
|---|---|
| Application version | 0.4.0 |
| Build | 54 |
| Manual edition | Offline manual edition 2026-11-02 (en) |
| Corresponding Traditional Chinese edition | zh-Hant.md (same edition, same features, same limits) |
The version on the public website may differ from this installer. Trust the version information inside the app and this manual.